Is your AC having issues and you suspect that the capacitor is to blame?
Bad AC capacitors cause all sorts of issues—from random shutdowns to tripping breakers.
Fortunately, testing an AC capacitor is a simple process that can be done with a multimeter.
In this article, I’ll go over the steps that you need to take to test your AC capacitor.
I’ll also go over how to test a dual run capacitor, and what to look for in the ratings and measurements of your AC capacitor.
The steps to test an AC capacitor
If you need to test your AC’s capacitor, you’ll need a few simple hand tools to get your AC’s panel open.
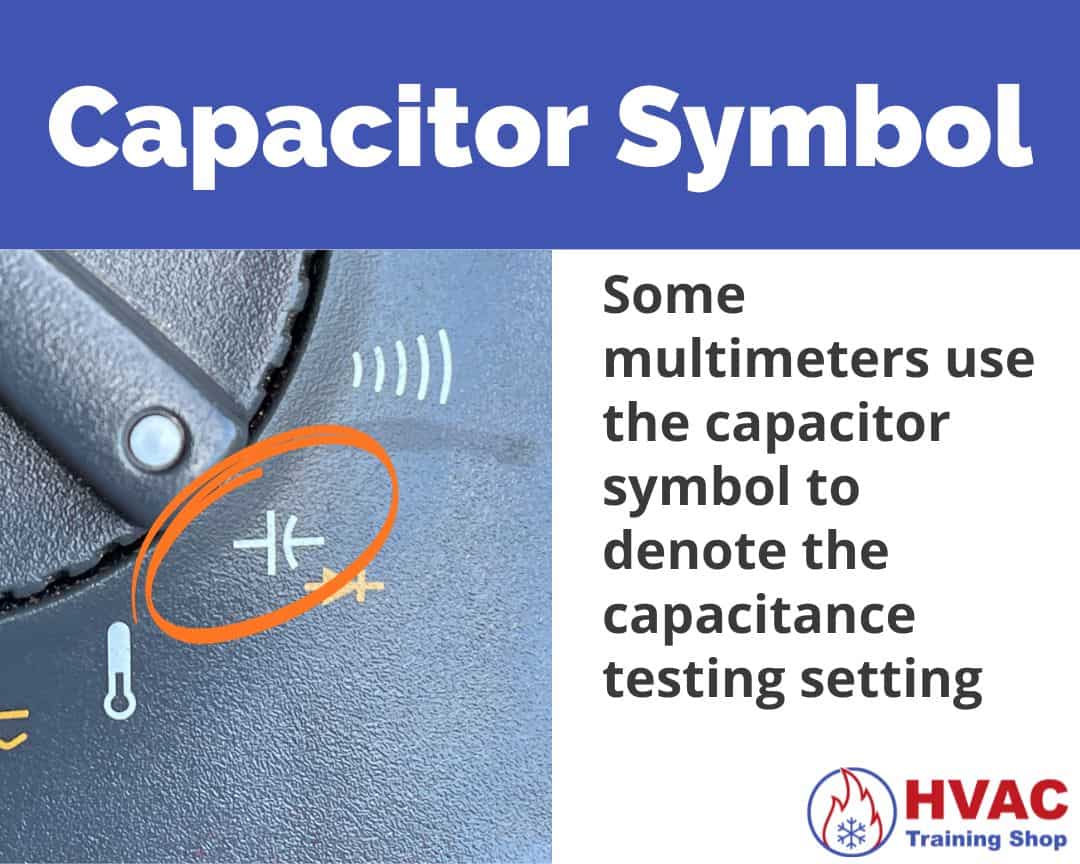
You’ll also need a multimeter with a capacitance testing setting.
Here are the steps that you need to follow to test your AC’s capacitor:
- Turn off the power to the AC unit
- Open the AC’s electrical panel cover
- Disconnect the wires from the AC capacitor
- Discharge the AC capacitor
- Test the AC capacitor using a multimeter
I’ll go over them below.
Turn off the power to the AC unit
Before testing your AC’s capacitor, the first thing that you need to do is turn off the power to the AC unit.
It’s critical to shut off power to your AC unit before doing anything else. Otherwise, you won’t be able to test the capacitor safely.
To shut off power to your AC unit, turn off its disconnect or its circuit breaker.
I prefer turning off the disconnect AND the circuit breaker just to be safe.
After shutting off power to your AC, verify that the power is shut off by using a multimeter or a non-contact voltage tester (also called a ticker).
Open the AC’s electrical panel cover
After turning off power to the AC unit, the next step is to gain access to the capacitor by removing the AC’s electrical panel cover.
The AC’s electrical panel cover is located on the side of the AC unit. Look for where the conduit from the disconnect goes into the AC unit and the electrical panel should be right there.
You’ll need a socket set or a nut driver to open the electrical panel cover. Carefully remove the screws (don’t lose them) and remove the panel cover to gain access to the capacitor.
Disconnect the wires from the AC capacitor
After getting the electrical panel cover open, take a picture of the old capacitor. You’ll need to get a picture of the wiring on the old capacitor just in case you forget where each wire goes if you install a new capacitor.
You should also take note of the wire colors and which wire connects to which terminal.
If you’re testing your AC’s dual run capacitor, it will have three terminals: “C”, “HERM”, and “FAN”:
- “C” stands for “Common” and connects to the contactor
- “HERM” stands for “Hermetically Sealed Compressor” and connects to the compressor
- “FAN” connects to the condenser fan motor
When disconnecting the wires from your capacitor, I recommend using a tool such as needle nose pliers to remove the spade connectors from the capacitor terminals.
While disconnecting the wires from the capacitor, be careful not to short the capacitor’s terminals to any metal objects or other terminals (you’ll be doing that in the next step).
Discharge the AC capacitor
After removing all the wires from the capacitor use a tool such as a long metal screwdriver to short the capacitor’s terminals together.
Hold the screwdriver by its handle and connect the terminals on the capacitor together using the metal shaft of the screwdriver.
Shorting the capacitor’s terminals discharges the capacitor and removes any residual energy from it.
When discharging the capacitor, only touch the plastic handle of the tool—do not touch any metal parts of the tool or the AC.
Test the AC capacitor using a multimeter
After discharging the capacitor, it’s time to test the capacitor using your multimeter.
You’ll need a multimeter with a capacitance test setting.
Check the capacitor’s rating on the label
Take a look at the capacitor’s label to see what it’s rated for.
For example, a capacitor that says “20uf” on the label is rated for 20 microfarads.
If the capacitor has two ratings on it, then it’s a dual run capacitor.
For example, a capacitor that says “45+5uf” on the label is a dual run capacitor. It is rated for 45uf on the herm terminal and 5uf on the fan terminal.
The capacitor will also have a tolerance rating on its label.
For example, a 20uf capacitor that says “+ 6% -6” is rated to be within 6% of 20uf, and should measure between 18.8 and 21.2uf.
AC capacitor testing procedure
Turn on your multimeter and switch it to the capacitance setting.
Next, hook up your multimeter’s leads to the capacitor, one lead to each terminal. Your multimeter will display the measured capacitance rating on its screen.
If you are testing a dual run capacitor, you can test one side at a time.
Hook up one multimeter lead to the common terminal and the other to the herm terminal. That will give you the capacitance of the compressor side of the capacitor, which is the larger capacitance rating.

Next, remove the multimeter lead from the herm terminal and switch it to the fan terminal. That will give you the capacitance of the fan side of the capacitor, which is the smaller capacitance rating.

For example, if you’re measuring the capacitance of a 45+5uf +/-6% dual run capacitor:
- The capacitance measured between the common and herm terminals should be between 42.3uf and 47.7uf
- The capacitance measured between the common and fan terminals should be between 4.7uf and 5.3uf
How to test an AC capacitor that has a resistor
Certain AC capacitors have a resistor bridged across their terminals. Typically, these are start capacitors that are wired in a way that does not allow them to discharge surplus electrical charge.
When testing an AC capacitor that has a resistor, it’s crucial to detach the resistor initially, prior to conducting any tests on the capacitor.
Attempting to test the capacitor with the resistor still in place will lead to an inaccurate capacitance measurement.
In situations where the resistor is soldered to the terminals of the capacitor, it’s sufficient to desolder only one end of the resistor in order to isolate it from the capacitor’s circuit for testing purposes.
After testing the capacitor, you’ll need to reinstall the resistor by resoldering or reconnecting it to the terminals of the capacitor.
What to do after testing your AC capacitor
If your AC capacitor’s measured capacitance is out of range of its specification, then you’ll need to swap it out with a new one.
Every PSC motor such as a compressor or condenser fan requires a specific capacitance in order to run correctly. So even if your AC capacitor is slightly out of specification, it’s still wise to change it.
That means you can’t use a capacitor with a lower or higher capacitance than what the motor is designed for—the capacitor needs to have the correct rating for the motor that it’s used with.
If your AC’s capacitor measures within its specification, then you can reinstall it and continue using it.
Connect the wires back to the capacitor in the same way that they were before you disconnected them.
Are you following my capacitor blog series?
Capacitors are a critical component of your AC system. I’ve written a few blogs answering questions that people have about capacitors. You can check them out by clicking the links below.
- What Does the AC’s Capacitor Do? Everything You Need to Know
- How to Test an AC Capacitor – The Complete Guide
- Bad AC Capacitor Symptoms – Here’s What to Look For
- Dual Run Capacitor – Everything You Need to Know
- Start Capacitor Versus Run Capacitor – What’s the Difference?
- AC Hard Start Kits – Everything You Need to Know


What about AC compressor start capacitor that has a resistor connected between the two terminals? Does that resistor have to come off first to test?
Hi John,
Thanks for asking this question, I didn’t touch upon that in my article. I will add it in my next revision.
If there is a resistor between the terminals on the capacitor, you need to remove the resistor before testing the capacitor. If you test the capacitor with the resistor still connected, you will get an incorrect capacitance reading.
Thanks,
-Trey
Indoor unit working .outdoor unit fan working but compressor not working
This article is very helpful. Read it before doing ANYTHING.
One thing the article does not mention is that often capacitors will test perfectly on a meter but fail in use because the dialectric breaks down under operating voltages of your AC unit.
Generally, capacitors used to be pretty inexpensive. If your capacitor is an inexpensive model, get one ahead of testing and simply replace. The most common failure in any old electronic product is wet capacitors – capacitors with any kind of wet, as in liquid or gel, dialectric. They dry up, even on the shelf. Keeping one at the house might save you and isn’t a bad idea at all but they dry up on the shelf, as well, just not as fast. So keep one on the shelf but if it’s been on the shelf for 5 or more years, when you have to go into the unit to test because your AC isn’t working, consider replacing the one on the shelf and in the unit with a brand new purchase capacitor.
If your capacitor is one of those terrible rip-off models, anything $20 or over – as high as a hundred dollars, well, I guess you’re probably testing and buying as needed.
Failed procedure. What do you do if your meter has no capacitor testing capability? There is a way, it should be on here.