HVAC Training Shop is reader-supported. As an Amazon Associate, I earn from qualifying purchases.
Keeping your furnace maintained is important for keeping it running efficiently. As a homeowner, there are a few steps that you can take to ensure that your furnace stays in good working order.
In this article, I’ll go over what you can do to inspect and maintain your furnace so it stays running properly.
Furnace Maintenance Checklist
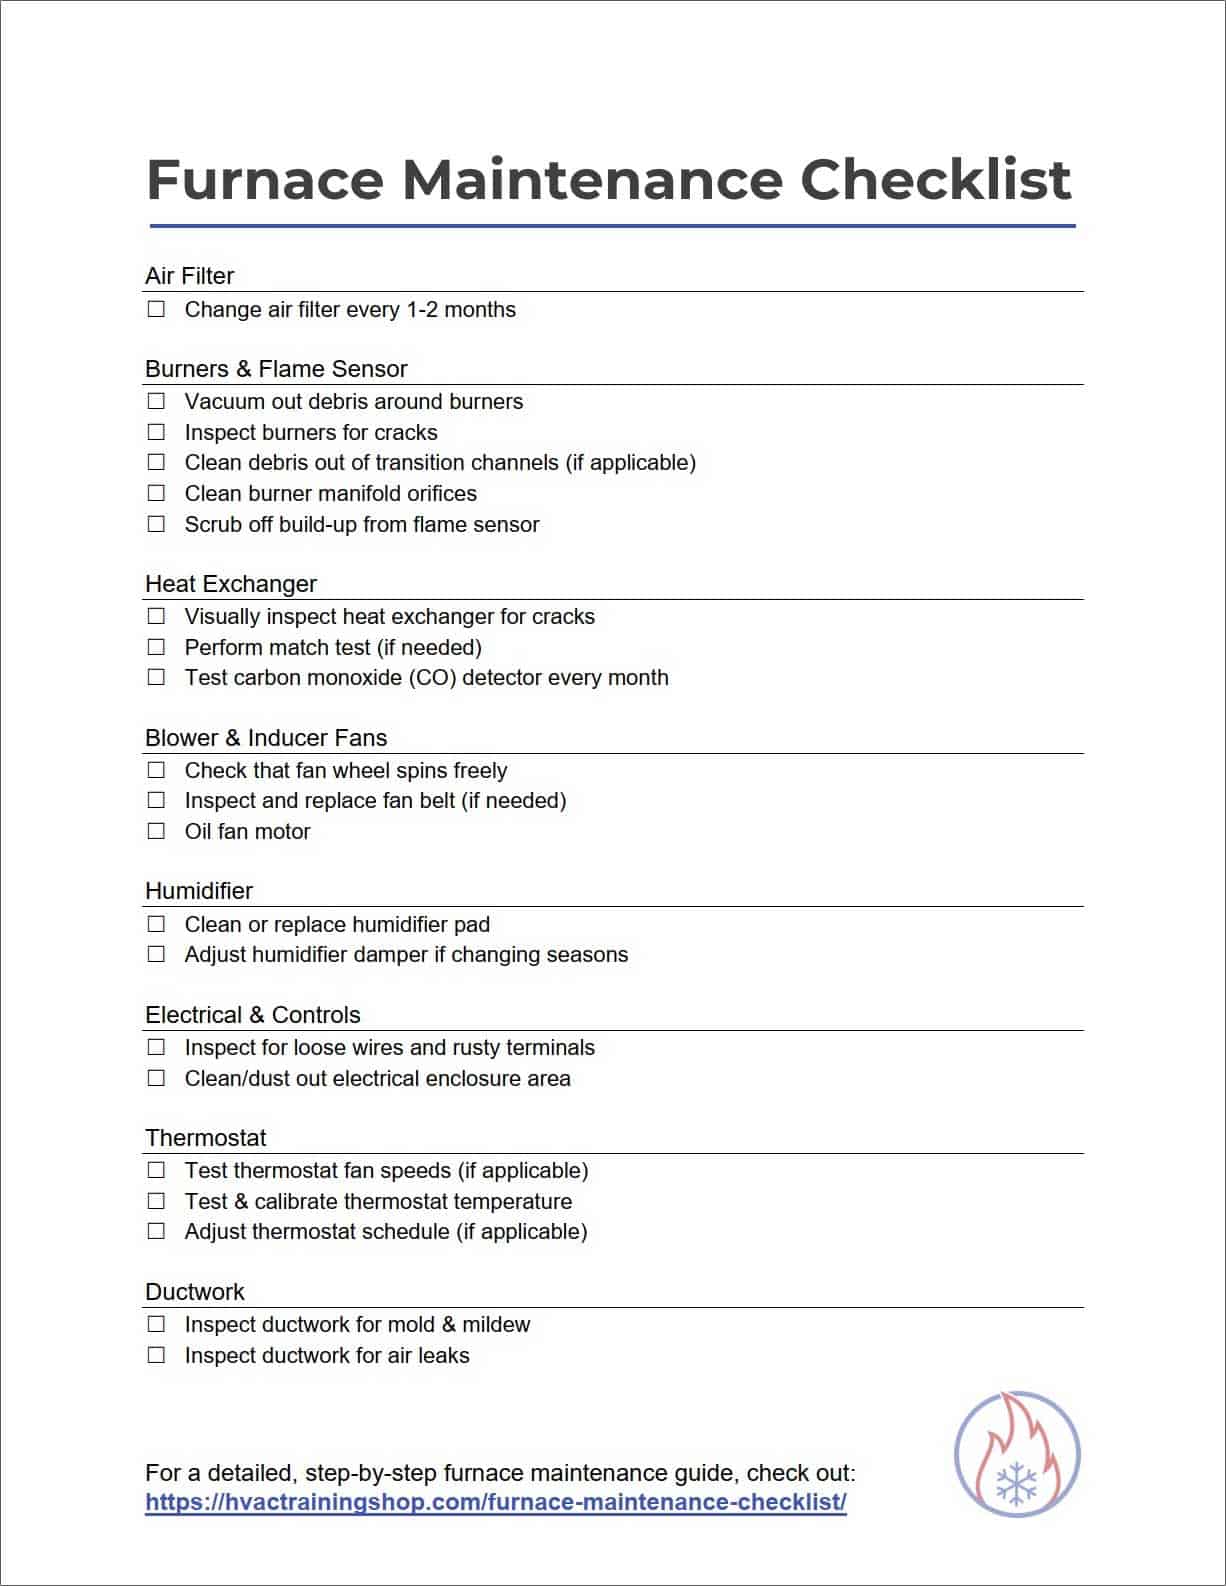
Below is a list of maintenance items that you should conduct on your AC system at least once a year. The only exception is changing the air filter, which you should do at least every 3 months, or as needed.
If you’re looking for a checklist that can you fill in or print out, check out my furnace maintenance checklist pdf.
1. Replace Air Filter
Air filters should be replaced at least every 3 months.
2. Clean burners and flame sensor
The burners and flame sensor need to be cleaned regularly.
3. Inspect heat exchanger and CO detector
Inspect the heat exchanger for cracks or leaks. Also, test your carbon monoxide (CO) detector and replace its batteries if needed.
4. Lubricate blower and inducer fans
Fans should rotate freely and need some oil to do so.
5. Clean humidifier
If you have a humidifier, clean it often if you have been using it.
6. Inspect electrical wirings and controls
Loose connections can cause equipment failure or fires.
7. Check thermostat for proper operation
The thermostat should control the furnace properly.
8. Check and clean air registers and ductwork (if needed)
Dusty air registers reduce airflow.
Furnace Air Filter Maintenance
The purpose of the air filter is to filter out dirt, dust, and other contaminants from getting into your home’s air. The filter is in the return air duct of the furnace, where the fan sucks in air.
Your furnace’s air filter should be changed at least every 3 months. Ideally, you’ll want to change it every 1-2 months. Pleated filters usually last a bit longer, but introduce a larger pressure drop in the system – be sure that your furnace is designed for that.
Non-pleated filters only last about 1 month, but they don’t block as much airflow. Many older HVAC systems that were not designed for large pressure drops use non-pleated filters. I have another article explaining the differences between pleated and non-pleated filters.
To replace the air filter on your furnace, first shut off power to the furnace. After the furnace completely shuts down, remove the filter access panel from the ductwork. Next, remove the old filter carefully, ensuring that dust or debris does not fall off the filter or spread anywhere else.
Throw away the old filter and insert a new filter into the filter compartment. If the filter has arrows, ensure that the arrows point toward the blower, in the same direction as the furnace’s airflow.
For more information about what kind of air filter you should use, check out my air filter guide.
Furnace Burner Maintenance
The burner is the part of the furnace that creates a flame by burning gas. Due to the combustion of gas, the burner is very susceptible to carbon and soot build-up. The furnace’s burner assembly should be inspected regularly for cleanliness and proper function.
When inspecting your furnace’s burners, the first thing that you should do is turn off the power and gas to your furnace. Never work on a furnace while the power is on! Next, remove the cover panel to gain access to your furnace’s interior.
Once inside the furnace, vacuum out the area where the burners sit to remove any debris. Next, remove the burners and inspect them. Most importantly, inspect the front of the burners where the flame comes out. Brush them down with a brass wire brush to remove any buildup.
Some burners have “transition wings” on their sides – these are thin channels that allow the flame to propagate from one burner to the next. The transition wings need to be clean and free of buildup as well. Dirty transition wings can prevent all of your burners from igniting.
While working on your burners, take note of the ignitor. The ignitor is identified by the two wires connected to it. It is best to leave the ignitor alone, especially if it is a hot surface ignitor. A hot surface ignitor is fragile and will break into pieces if it is hit or mishandled. If your ignitor is not working, then it is best to just replace it rather than attempt to clean or troubleshoot it.
I also have an article about how to check and replace your furnace ignitor, if something goes wrong with it.
Furnace Burner Manifold Maintenance
The burner manifold in a furnace is responsible for injecting fuel into the burners. The gas or fuel is ejected from the manifold via small orifices that face toward the burners. The fuel flow is controlled by a valve assembly that is connected to the manifold.
The small orifices on the burner manifold need to be cleaned to ensure that they are not clogged. A thin wire or paperclip works well to stick inside of the orifice and scrape away any buildup.
Furnace Flame Sensor Cleaning
Another part to maintain is the flame sensor. The flame sensor is a small metal rod in front of one of the burners. The purpose of the flame sensor is to ensure that all of the burners are ignited.
If the flame sensor does not detect a flame, then it will shut off the furnace. If all the burners are ignited but you have a dirty flame sensor, the flame sensor will mistakenly shut off your furnace.
To clean the flame sensor, first, disconnect its wire and remove it. The flame sensor is easily identifiable because it has only a single wire going to it. The flame sensor is usually held in by a single screw that is easily accessible.
After removing the flame sensor, scrub the metal rod to remove any built-up char. You can use many different materials to clean the flame sensor: a wire brush, a piece of cloth, or my personal favorite – a green scouring pad.
Be careful to not scratch or damage the ceramic housing of the flame sensor. The ceramic part of the flame sensor is delicate and will break easily.
After cleaning the flame sensor, replace it in the hole and screw it back in.
Furnace Heat Exchanger Inspection
Although most furnace heat exchanger maintenance is best left to the pros, you can conduct a routine inspection to ensure that everything is working correctly.
The first thing you should do is shut off the power and gas supply to your furnace. Next, remove the access panel to get to the furnace’s mechanical parts. Once inside the furnace, take a look at the heat exchanger cells behind the burner. Look for any signs of damage, excessive rust, or carbon buildup.
Take a look for any cracks in the interior of the heat exchanger’s ports. It may be helpful to remove the burner or blower to see the heat exchanger more easily. You can use an inspection camera or endoscope to search for cracks where you cannot normally see – in tight spaces where your heat exchanger is located.
If your furnace’s heat exchanger is cracked, replacing it is a costly option. It is oftentimes wiser to just replace the entire furnace itself. Consult with a local HVAC professional to weigh your options.
Heat Exchanger Match Test
A nifty trick to use to search for heat exchanger cracks is the heat exchanger match test. The match test helps you find a cracked heat exchanger by searching for airflow from your blower in your heat exchanger.
To conduct a heat exchanger match test, first ensure that your furnace is set to “FAN ONLY” mode. Make sure that your furnace is NOT set to “AUTO” or “HEAT” – you do not want the burners to ignite while checking the exchanger. Turn off your gas supply line to your furnace.
While your furnace’s blower is running, light a match and put it in front of each of your heat exchanger’s cells, one at a time. Observe the flame of the match – if it blows in the wind or goes out, then that is a good sign that your heat exchanger has a crack or hole. The reason this test works is that the air from the blower travels through a hole in the heat exchanger to blow out the match.
Carbon Monoxide Detector
A damaged heat exchanger is extremely dangerous to the occupants of your home. When your furnace’s heat exchanger is cracked, poisonous gases infiltrate the stream of air that goes into your home. This is why it is important to have at least one carbon monoxide (CO) detector in your home if you have a furnace.
Generally, you’ll want at least one CO detector for every floor of your house, and one in each bedroom for extra protection while you and your family are sleeping.
CO detectors don’t need to be placed up high like smoke detectors do. CO is heavier than air, so it tends to fall toward the ground anyway. So CO detectors are perfectly fine being mounted on a wall.
It is important to test your CO detectors regularly – at least once every month. If your CO detector has batteries, be sure to replace them every 6 months. Even if you replace the batteries often, all CO detectors will eventually need to be replaced. This is because the sensor in the CO detector will wear out after about 5-7 years.
If you are unsure of the age of your CO detector, it is a good idea to just get a new one. When installing a new CO detector, mark down the date that it was installed – that way you’ll know when it needs to be replaced again.
Furnace Blower Maintenance
The blower on your furnace is the fan that circulates air throughout your home. The blower fan is responsible for ensuring that the heat produced in your furnace is delivered to your home’s interior.
To maintain your furnace’s blower, first shut off all power to your furnace. Open up your furnace’s access panel to get to the blower.
The first thing that you’ll want to check is that the fan wheel spins freely and smoothly. Sometimes a fan motor will wear out, which requires replacement. Also, take a look at the condition of the fan blades to ensure that they are not too dirty or broken.
If your fan has a belt and pulleys, inspect those as well. Ensure that the fan belt is in good condition and tensioned properly. Fan belts usually last about 1 year.
Every once in a while your blower motor will require lubrication. Lubricating your fan motor with oil is important to keep it running smoothly. Most older fan motors have oiling ports on them, so you can use a lubricator such as Liquid Bearings Synthetic Oil directly into the port.
Newer fan motors do not have oiling ports, so you should oil the motor shaft directly, where the motor shaft connects to the motor body.
Furnace Inducer Maintenance
The inducer is a fan that blows the furnace’s combustion gases outside the building. It works by sucking hot combustion gases through the furnace’s heat exchanger and exhausting them outside your house.
The furnace’s inducer assembly consists primarily of a fan to blow air, and an electric motor to spin the fan. Since the inducer plays an essential role in the operation of your furnace, the inducer must stay in good working order.
To conduct maintenance on the inducer, switch off the power to your furnace. Next, open the access panel to your furnace so you can see the inducer.
The first maintenance check that you’ll want to do is check if the inducer motor is secure. Grab the motor and see if anything is loose or missing. Some inducer motors have rubber grommets that are required for the inducer to stay secure. A loose inducer motor can cause your inducer to rattle and make noise.
Some inducer motors have a cooling blade—a disc that is attached to the back of the motor. If yours does, spin the cooling blade to see if the motor turns freely. If the motor grinds or gets stuck, then your inducer motor is bad and needs to be replaced.
If your inducer motor gets stuck, you can sometimes oil the motor to get it spinning freely again. Older inducer motors have convenient oil ports on them for this purpose. Newer inducer motors usually do not have oil ports. If your inducer motor does not have oil ports, you’ll need to oil the motor shaft so that the oil seeps into the motor.
Keep in mind that oiling an inducer motor to get it running is usually a temporary fix. If you find yourself in a situation where the inducer is grinding or getting stuck, you should look into replacing the entire inducer assembly as soon as possible.
The vent connector—sometimes referred to as the vent boot, is the piece that connects your inducer fan to the flue vent. The vent boot must be always tight and secure. A leak in the vent boot will cause harmful combustion gases to seep into your house.
Furnace Humidifier Maintenance
In dry climates, your HVAC system might include a humidifier to help maintain comfortable humidity levels in your home. The purpose of a humidifier is to add moisture to the air. Proper humidity levels are necessary for indoor comfort. Having the correct humidity levels also helps prevent skin dryness, allergies, and breathing problems.
Three common types of central humidifiers are installed in homes:
- Reservoir humidifiers: These humidifiers have a rotating pad that picks up water from a small reservoir. As air blows across the pad, moisture goes into the air, increasing the humidity level inside your home.
- Flow-through humidifiers: These humidifiers are also known as “drip-style” humidifiers. They work by constantly dripping a small stream of water across a pad. As air blows across the pad moisture is introduced into the air, increasing the humidity level inside your home.
- Steam humidifiers: These types of humidifiers work by heating up water and injecting steam into your furnace’s airflow. Steam humidifiers tend to be the most efficient and lowest maintenance. But the performance of a steam humidifier also comes at a cost – they tend to be the most expensive.
Because humidifiers use water to introduce moisture into the air, they tend to have lots of issues with dirt and mold. Humidifiers require regular maintenance – at least once a month when they are used.
No matter what kind of humidifier you have, you should clean it regularly. Cleaning your humidifier is the number one thing that you can do to keep it working properly and prolong its life.
Another thing to check on a humidifier is that its damper is set to the proper position. If you want the humidifier to add humidity to your house, then open the humidifier’s damper. The humidifier’s damper is usually open for the dry winter season and closed for the moist summer season.
Reservoir and Flow-Through Humidifier Maintenance
Maintaining reservoir and flow-through style humidifiers requires cleaning the pad, casing, and tubes. The exact steps will differ depending on the style of humidifier that you have.
Generally, you’ll need to remove the pad and soak it in a vinegar solution to remove any mineral buildup. While the pad is soaking, scrub the interior of the humidifier case to remove any dirt and mineral buildup. After rising out and drying the case, clean the supply and drain tubes to remove any mineral and mold buildup.
When inspecting your humidifier’s pad, take note if it is damaged or brittle. An easily damaged pad should be replaced. If the pad falls apart when you touch it, it needs to be replaced. Even if it is not damaged, it is a good idea to replace the humidifier’s pad at least once every year, no matter what condition it is in.
Steam Humidifier Maintenance
Steam humidifiers tend to be a bit more complicated, so maintaining them will greatly depend on the make and manufacturer. Generally, maintenance of a steam humidifier involves a few steps. First, turn off the humidifier at the unit’s control switch. Next, wait for the dehumidifier to complete its drain cycle.
After your dehumidifier is drained, turn off the unit’s power supply at the disconnect to ensure that there is no power to the unit. Next, remove and clean the overflow pan and overflow tank.
You might need to use a vinegar solution to remove any mineral deposits. Take note that the overflow tank usually has an O-ring. Remove the o-ring and clean the area underneath it. Replace the O-ring with a new one if it is damaged.
Some steam humidifiers have a water filter. Check with the manufacturer’s instructions on when you should replace the water filter.
Furnace Electrical and Controls Maintenance
Part of a properly running furnace is its electrical and control systems. Even though you should usually leave most electrical maintenance to professionals, there are still some tasks that you can do to maintain your furnace.
Before working in your furnace’s electrical system, turn off all power to the furnace. Next, open the access panel for your furnace’s electrical and controls wires.
The first thing that you’ll want to check is that all connections are strong or tight. Weak electrical connections can cause erratic behavior or even fires, so you’ll want to ensure that there are no loose wires or rusty terminals.
Next, clean out the electrical enclosure area with compressed air or canned air such as Dust-Off. Make sure the electrical parts and wires are neat, clean, and free of debris and insects. Excessive debris around electrical equipment can cause short circuits and damage equipment.
After your furnace’s electrical system is neat and clean, replace its access panel and turn the furnace’s power back on.
Furnace Thermostat Testing
Test your furnace’s thermostat for proper operation. If you have a multi-speed fan, make sure that all of your fan speeds work. Make sure that any valves or dampers that you have are functioning properly as well.
Use a portable temperature sensor to check that your thermostat is reading the correct temperature. Your thermostat should read about the same temperature as the temperature sensor, within 1 degree Fahrenheit, or 0.5 degrees Celsius.
If your furnace’s thermostat has a schedule, check the schedule to ensure that it is set up correctly, according to the times and days that you are usually home. Also, test the schedule to see if your furnace turns on and off according to the schedule.
If you have any other electrical or control issues with your furnace, it is best to consult an HVAC professional.
Furnace Ductwork Inspection and Maintenance
Ductwork plays a critical role in your furnace’s operation because its job is to serve air throughout your home. Air leaks, dust, and even mold are some problems that can arise in the ductwork. So it is important to inspect and maintain your furnace’s ductwork if you want the best performance.
While conducting routine maintenance on your furnace or HVAC system, be sure to inspect your ductwork for signs of damage.
Air leaks on ductwork can be caused by a few things. Physical damage to your ductwork can cause holes and reduce efficiency. Moisture can cause rust holes to form on metal ductwork – so keep any water or condensation away from your ductwork. Look at the seams where the metal ductwork sections are crimped together – inspect for damage or air leaks.
Mold in ducts is caused by high humidity and may be a common issue depending on the climate that you live in. Mold can also be caused by air leaks, so that’s another reason why your ductwork must be tight.
If you are going to scrub off mold from your ductwork, be sure that you have the correct personal protective equipment (PPE), such as safety glasses, gloves, and a mask. Using a plastic utility brush with some light detergent is usually enough to get rid of most mold on ductwork. Do not use chlorine products such as disinfecting wipes, they will cause your ductwork to rust.
If you need to disinfect moldy areas, use a fungicide spray such as RMR-141. Fungicide sprays will disinfect the area that they are sprayed on, and will inhibit the growth of mold, so it doesn’t come back.

Final Thoughts
Taking some time to do a few routine maintenance tasks and inspections can prolong the life of your furnace.
Conducting your own preventive maintenance will help you familiarize yourself with your furnace system, so you’ll have a better idea of how everything is supposed to run. By knowing how everything is supposed to work, you’ll have a much better idea when it’s time to call the pros in.


