HVAC Training Shop is reader-supported. As an Amazon Associate, I earn from qualifying purchases.
Are your AC’s refrigerant lines sweaty? That’s not refrigerant leaking out of them—it’s water condensing on them.
Water condenses on AC lines when the line gets too cold—but there shouldn’t be condensation on the lines under normal conditions.
If there is condensation on your AC lines, you’ll need to check for airflow and refrigerant issues. You should also check the insulation since at least one of the lines (and sometimes both) should be insulated.
In this article, I’ll go over everything that you should do if there is condensation on your AC lines. I’ll also discuss the science of condensation on AC lines—so you’ll better understand what’s causing the condensation to form in the first place.
What causes condensation to form on AC lines?
Condensation will form on an AC line if its temperature is lower than the dew point of the ambient air surrounding it.
It’s just like what happens to a cold glass of water outside on a hot summer day—it starts sweating.
But a sweaty AC line is not a normal occurrence. Most times, if there is condensation on one of your AC lines, there is an issue with your AC system.
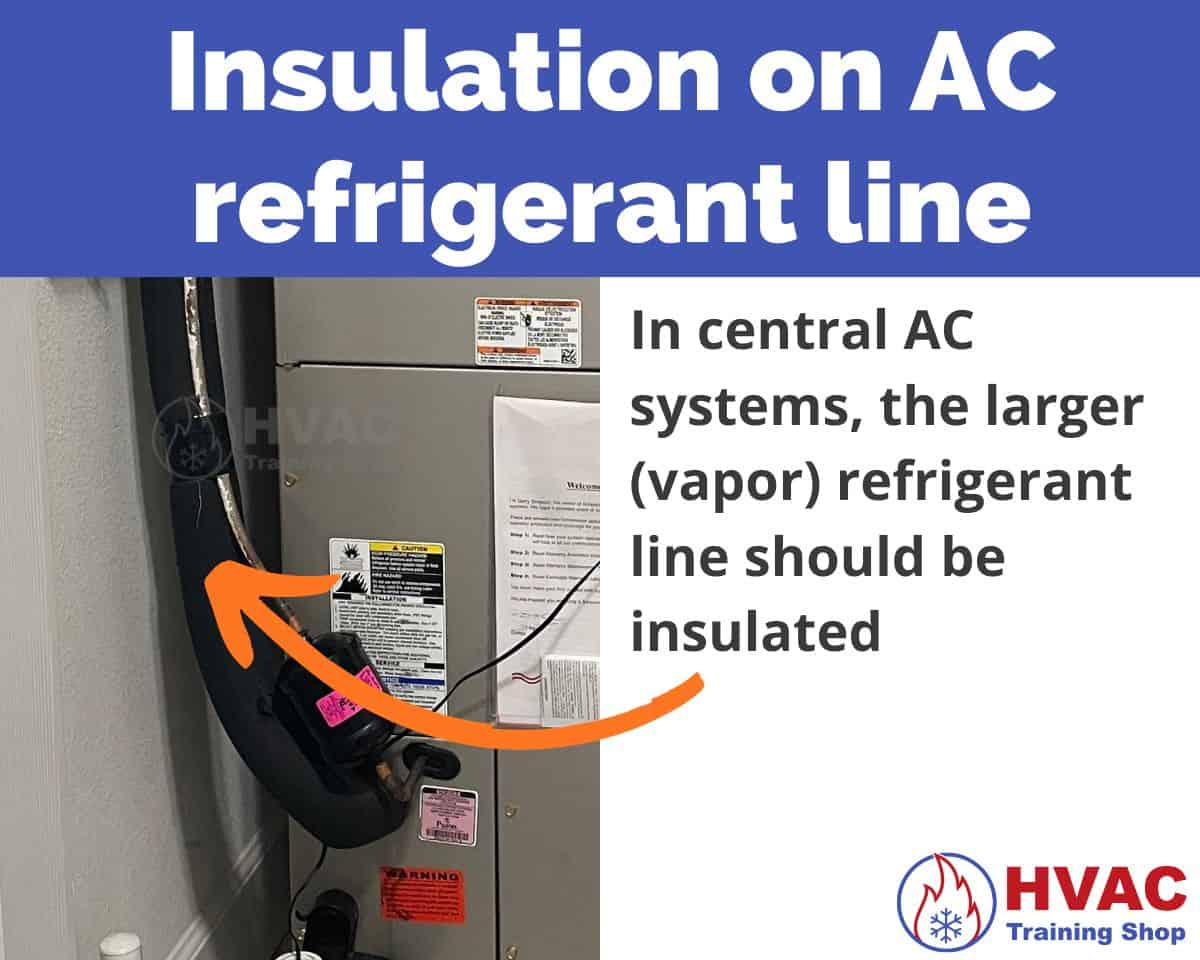
Let’s get one thing out of the way—at least one (and sometimes both) of your AC lines should be insulated.
In most cases, the larger AC line will have insulation around it to prevent heat transfer and condensation.
If you have a mini split AC unit, most manufacturers specify that both lines need to be insulated.
The larger AC line is the vapor line—it contains low-pressure, low-temperature refrigerant that’s leaving your AC’s evaporator coil and going to the compressor in your AC unit outside.
The vapor line is cold enough for condensation to form on it under normal run conditions.
So if your vapor line doesn’t have insulation around it, condensation will form on it when your AC runs—even when nothing is wrong with your AC.
Change the air filter
If there is condensation on your AC line, the first thing that you should do is change your air filter.
Why does changing your air filter help reduce condensation on your AC lines?
The restriction from a dirty air filter will reduce the amount of airflow going through your AC system. This reduces the heat load on your evaporator coil, causing the refrigerant flowing through your system to remain at a low temperature.
The result is that your evaporator coil will be much colder. In addition, your refrigerant lines will become colder as well—and condensation will form on them if their temperature is below the dew point of the ambient air.
Check for air vent and register blockages
Another thing that you should do is check your air vents and registers for blockages.
Even simple things such as curtains or furniture blocking an air vent can cause your AC line to condensate.
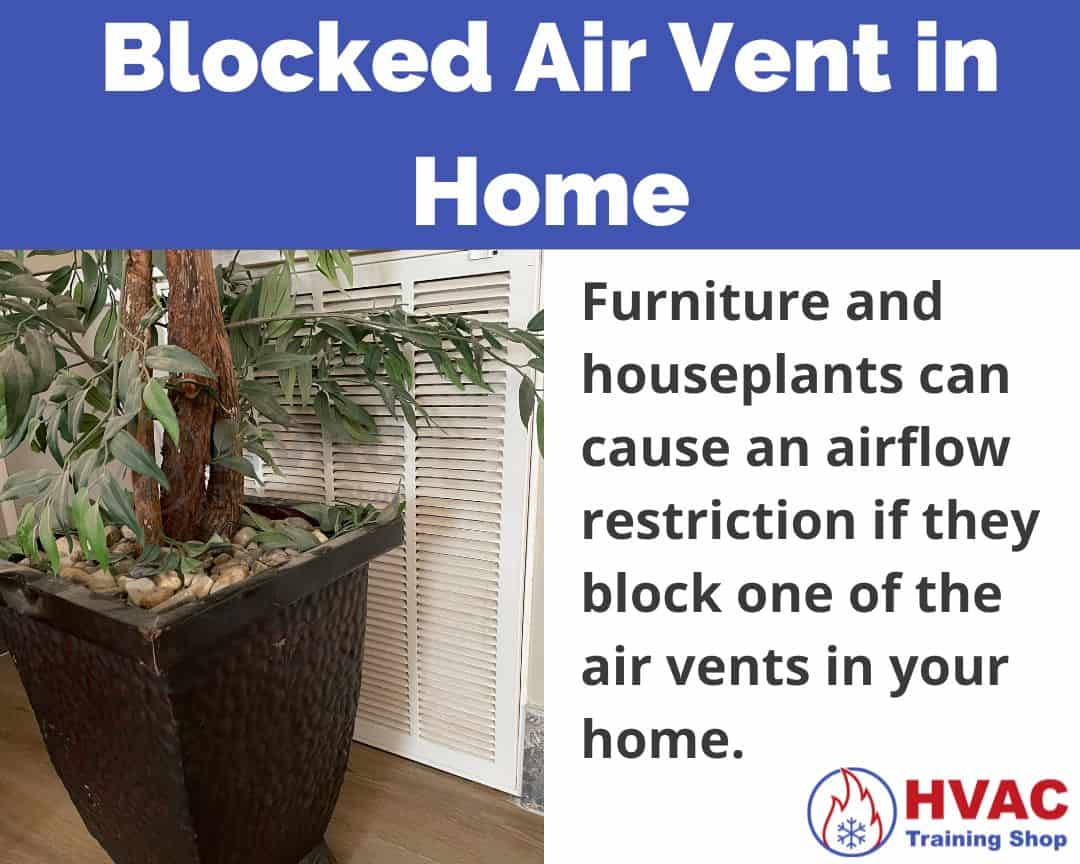
Why do vent and register blockages cause AC lines to form condensate on them?
It’s similar to a dirty air filter—airflow restriction.
When your air vents are blocked up, less air flows through your AC system. This causes the refrigerant in your AC system to absorb less heat and stay at a low temperature.
Your refrigerant lines will become colder and may have condensation form on them.
Check the blower motor
While we’re on the subject of airflow, another thing to check is your AC’s blower motor.
The blower motor is responsible for generating airflow through your AC system. However, there are a few things that can go wrong with a blower that will inhibit the airflow that it generates.
Before checking your AC’s blower, shut off power to the AC system. That way your AC won’t start up while you’re working on it.
The first thing that you should check is if the blower wheel is dirty. A dirty blower wheel will negatively impact the airflow through your AC system.
If there is excessive dust build-up on your blower wheel, clean it off.
Be careful about using compressed air to blow the dust off of the blower wheel. If you spray your blower wheel down with compressed air, the dust tends to just fly everywhere—leaving you with an even bigger mess to clean up.
After cleaning off the blower wheel, grab the blower wheel and turn it by hand. Ensure that the blower wheel turns freely, and that there is no grinding or resistance to turning.
If your blower wheel is rubbing up against something, it will need to be adjusted so it spins correctly.
If there is grinding or excessive resistance when you turn your blower motor, the blower motor will need to be repaired or replaced.
Another thing to check (especially if you have an old unit) is the fan belt.
The fan belt or pulley system may need adjustment to provide the correct amount of airflow in your system.
However, the blowers in most residential AC units nowadays are direct drive, and units with fan belts are becoming less and less common.
The last thing to check is your blower motor’s airflow dip switch settings. Some newer AC units have small dip switches on them that are used to adjust the airflow settings of the blower, among other things.
It’s unlikely that the dip switch settings are wrong since they are set during the installation and commissioning of the unit. But I thought I’d mention them here since they do cause issues from time to time—especially if they’ve been toyed with by a previous homeowner.
Check the evaporator coil
After you’re done checking the blower, the next thing to check is the evaporator coil.
Sometimes, evaporator coils can get clogged up with dirt and dust—especially if the unit ran without an air filter for a long period of time.
The evaporator coil is usually located at the top of the air handling unit. If you’re unsure, look for where the lineset goes into the unit.
Unfortunately, not all evaporator coils are easy to gain access to. Some evaporator coils are sealed up behind a layer of sheet metal that you need to cut through to get to it.
Sometimes, you’ll be lucky and have a handy access door that you can open up to get to the coil.
Take a look at the coil and make sure that it’s clean and not clogged. I find it helpful to shine a flashlight through the coil to see if you can see through it.
If you find that your evaporator coil is caked up with dust, you’ll need to clean the dust off. I recommend removing whatever dust you can by hand, then using a vacuum to remove the rest.
Whatever you do, be sure to be gentle when cleaning the evaporator coil. Besides having delicate fins that are easily bent, the fins are sharp and can cut you if you’re not careful.
Check the refrigerant system for blockages
If there are blockages anywhere in your AC’s refrigerant system, condensation may form on your AC’s lines.
Why does that happen?
If there is a restriction in one of the devices on your AC’s liquid line, the decrease in pressure from the restriction will cause a reduction in refrigerant temperature.
Sometimes, the reduction in refrigerant temperature is enough to cause condensation on your AC line.
The most common devices to get blocked up are the refrigerant metering device (such as a TXV) and filter drier.
One way to find a blockage is to measure the temperature drop across a suspected component. For example, if you see an excessive temperature drop (more than 1 or 2°F) across a filter drier, then there is likely a blockage inside of it.
Finding a refrigerant blockage at a metering device is more challenging since its entire job is to restrict refrigerant flow. However, if the refrigerant leaving a metering device is below freezing temperatures, there is a good chance that the metering device is blocked up or malfunctioning.
If your AC system has a refrigerant blockage, then you’ll need an HVAC professional to repair it.
The repair process involves draining down the entire system of refrigerant, replacing/repairing the blocked-up component, and then recharging and recommissioning the system.
Check the refrigerant system for leaks
The one last thing to check is if your AC system has any refrigerant leaks.
A refrigerant leak may cause your refrigerant lines to see a drop in temperature—enough for condensation to form.
One thing that I should mention is that finding a refrigerant leak is one thing. Repairing a refrigerant leak is a whole ‘nother.
If your AC system is leaking refrigerant, then you’ll need a licensed HVAC professional to repair the leak and recharge your system to its proper levels.
Even though you’ll need an HVAC professional to repair a refrigerant leak, there are a few signs that your AC system is leaking refrigerant—and you’ll be able to observe these yourself:
- Freezing at the evaporator coil
- Hissing noises coming from refrigerant lines or coils
- Bubbles coming out of refrigerant lines or coils
- Air conditioner not blowing cold air
Of course, the most surefire way to find a refrigerant leak in your AC system is to use a refrigerant leak detector. A leak detector will detect the presence of refrigerant gas, even if you can’t see any signs of leakage.
In any case, if you find signs of refrigerant leakage from anywhere in your AC system, then you’ll want to contact your local HVAC professional to diagnose and repair the leak.
Are you following my air conditioner condensate blog series?
Condensate issues are one of the most common issues with central air conditioners. I’ve written a few blogs answering questions that people have about central air conditioner condensate. You can check them out by clicking the links below.
- AC Condensate Drain Line Clogged? Here’s What to Do
- AC Leaking Water? Here’s What to Do
- AC Float Switches – Everything You Need to Know
- Excessive Condensation From Your AC? Here’s What to Do
- Condensation on AC Lines? Here’s What to Do
- AC Vents Sweating? Here’s What to Do
- No Water Coming Out of Your AC Drain Pipe? Here’s What to Do


