Your portable air conditioner is a useful tool for cooling an area in your home. But like any tool, it must be maintained to operate properly.
Cleaning your portable AC is an essential task that you should do at least once a month. If your home is dusty or humid, you’ll want to clean it even more often.
In this article, I’ll go over 4 easy steps that you can follow to clean out your portable air conditioner. These steps should be followed whenever you conduct periodic maintenance on your portable AC—or when you’re getting ready to store your portable AC after the cooling season is over.
Empty the condensate collection tank
The first thing that you need to do when cleaning your portable AC is empty its collection tank.
The condensate collection tank should have at least some water in it. If you live in a humid climate, then it may have a lot of water.
So what’s a condensate collection tank for? And why does it have water inside it in the first place?
When an air conditioner runs, it cools down the air in your home. As the air is cooled, water condenses out of the air and drains into the collection tank in your portable AC.
To put it simply—water is a byproduct of the air conditioning process.
To empty your portable AC’s collection tank, follow these steps:
- Turn off and unplug the AC.
- Bring the portable AC outside. You need to bring your portable AC someplace where it’s okay to dump water. Most portable ACs have wheels underneath them so you can roll them outside.
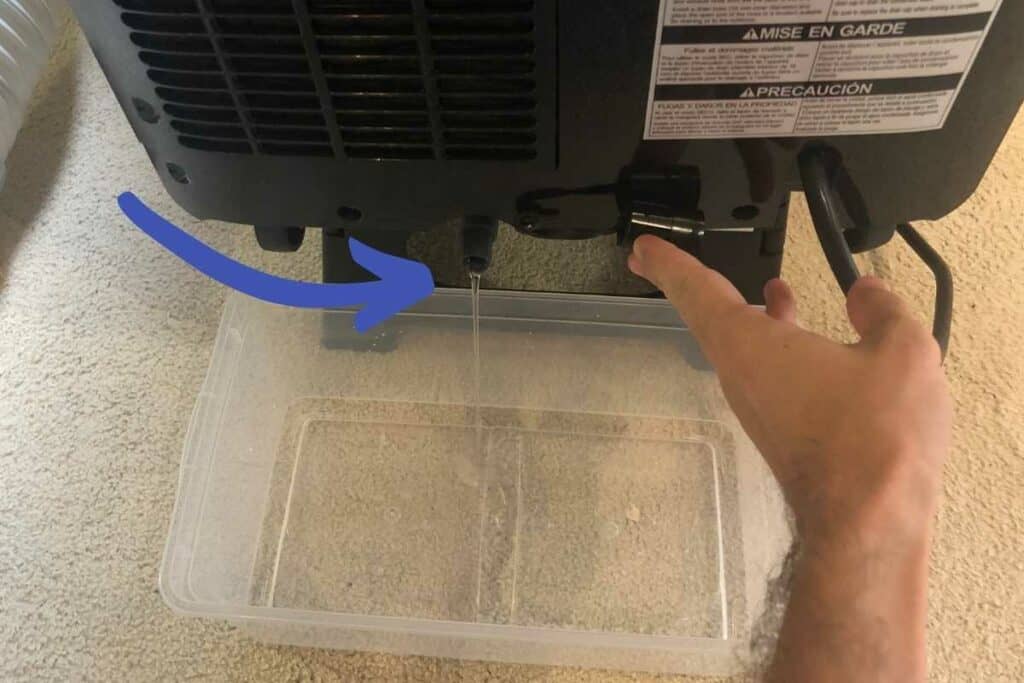
NOTE: If you are unable to get the portable AC outside, then you can put it on an elevated surface instead. As long as there is enough room to stick a container under the portable AC to collect water, then you’ll be good. - Remove the drain spout cap. After removing the drain spout cap, water should start to empty out of the AC. If you’re emptying the water into a container, then be sure that the container is large enough to collect all the water. You can also have a second container on standby if the first one gets full.
NOTE: If you’re planning on storing the AC until next year, leave the cap open and allow the AC to fully drip out while you’re performing other cleaning tasks. - Replace the drain spout cap. After the water is finished draining out, replace the drain spout cap.

If you find that your condensate collection tank is filling up quickly, it could be due to several reasons—check out my article below:
Clean the air filters
The air filters in your portable AC will get dirty as long as you are using your AC. It’s not a matter of IF, but WHEN you will need to clean your portable AC’s air filters.
So why does a portable AC need air filters anyway?
Contrary to popular belief, the main purpose of the air filters is NOT to provide clean air to your home. The main purpose of the air filters is to protect the AC’s internal components.
If your portable AC did not have air filters, then the coils and fans would get extremely dirty and dusty. Eventually, all that built-up dust would plug up your AC and cause it to stop working.
That’s where the air filters come into play. The air filters catch dirt and dust before they can get inside your AC’s internal components
To clean your portable AC’s air filters, follow these steps:
- Turn off and unplug the AC. Your portable AC will need to be off before you clean its filters.
- Remove the plastic grilles from the AC’s filters. Most portable ACs have some sort of plastic grille covering the filters. Remove the grilles so you can access the filters.
- Remove the air filters from the AC. Most portable ACs have small plastic mesh filters that are easily snapped in and out of place. When removing the air filters from your portable AC, take note of their orientation—that way you have an easier time reinstalling them after cleaning.
- Clean the air filters and plastic grilles. If your portable AC has plastic mesh filters (most do), then you can rinse them out with water.
When rinsing out your air filters, spray them with water from the inside out—spray the side that faces inside the AC. This is so that the water pushes the dust out of the filter, rather than trying to push it into the filter.
After cleaning the filters and grilles, set them aside to dry. - Reinstall the air filters and plastic grilles. After the filters and grilles are finished drying, reinstall them into the portable AC.
Check the evaporator and condenser coils
There are two coils in your portable AC:
- The evaporator coil is responsible for cooling the air that goes inside your home.
- The condenser coil is responsible for heating the air that goes outside your home.
Both of these coils should be clean of dust and debris to maintain efficient performance. Furthermore, if they are dirty then they are more prone to corrosion.
If your AC has its air filters installed, then you won’t have too much to worry about—the air filters will catch most of the dust and debris. However, you should still take a look at the coils to check if there is any residual dirt on them.
Also, take note of any bent fins on your coils. Bent coil fins will reduce cooling efficiency and airflow.
If you find any bent fins in your coils then you can use a fin comb to repair it. For more information about fin combs and fin repair, check out my article below:
Clean the air discharge vents
There are two air discharges in your portable AC:
- The cold air discharge is where the cold air comes out. It’s usually located on the front or top of your portable AC.
- The warm air discharge is where the warm air comes out. This is where the exhaust hose hooks up to. It’s usually located on the back of your portable AC.
Both of these air discharges should already be pretty clean—as long as you have the air filters installed. There may be some minor residual dust on them—that’s perfectly fine and you can just wipe it off.
If there is excessive dust built up on either of these discharge vents, check that your air filters are installed and there are no breaks or leaks in them.
If you find a break or tear in one of your air filters, it will need to be replaced.


